Tuesday, December 15, 2009

Think you are going to save money-think again!

I mentioned on my last post that I was going to write about the costs involved in making your own wine. Understanding the costs involved is important for clarifing your reasons for starting this hobby. Think you are going to save money, think again!...

Below is the cost breakdown for two of the wines I'm making this year, the Nebbiolo and the Sauvignon Blanc. I'm going to divide the costs into three sections for reasons that I hope to make clear... Also I'm using current prices as quoted on my favorite wine making supply store.


1. "fixed" cost per bottle
2. Cost of the grapes
3. Equipment


1. "Fixed" cost per bottle


These are "fixed" costs since they typically do not change with the variety of the wine I'm making, e.g. a $1.25 cost per glass bottle does not change depending on the wine put into it.


Wine Bottle$1.25Yes I recycle, but need to buy also. Some times it's worth buying 2 buck chuck just for the glass!
Corks$.23I use 1 3/4" Agglomerated corks...e.g. easy to work with, good compromise between quality and price.
Label$.25an estimate of paper and Ink costs. I print my own labels on self stick label stock 4 per page
Chemicals$.40Yeast, ML culture, Potassium Metabisulfate, yeast food, etc.
Cap$.10 These are the metalic heat shrink capsules. Probably the lowest cost cap... I use wax and also plastic slip on when I can find them .
Total per bottle$2.23So already it's more expensive than 2 buck chuck!


2. Cost of the grapes....


Nebbiolo$2.60 per bottle$.75/lb x 250 lb = $ 187.50 yield @ 6 cases
Sauvignon Blanc$1.88$180 for 22 gallons yield @ 8 cases


3. Equipment: I think it's best to look at the equipment costs as a startup or investiment cost and then perhaps a yearly replacement or maintenance cost.

So for startup costs for a typical 6 case {250lbs of grapes} I think you'll need:

Cusher/destemmer -- probably don't need one, most grape suppliers will crush for you at grape pickup time.

Press: you need one, or at least be able to rent one: new #35 press --$435 This is the press I have, and I expect to be the only press I'll ever need. Rentals run about $35 a day.

Siphon hoses, rubber stoppers, fermentation locks, glass carboys, Hydrometer = @ $110

Wine Pump: not needed but recommended... I use a siphon hose to move all my wine around. However, to do this I have to be able to lift carboys up onto a counter to get the siphon to flow {heavy, arkward...}... you should consider a pump. Low end cost @ $140

Bottle Filler: for bottling less than 15 cases at a time, use an inexpensive filler tube = $4

Bottle Corker: You should have your own. While you could get by with a $25 hand corker, I recommend the Italian Floor corker at $125. It will last a lifetime.

So I would say it takes about $415 to get started if you rent a press... Of course if you can borrow or share some of the equipment, costs will go down. Also you could skip some recommend equipment or go low end until you are convinced this is the hobby for you.


Yearly replacement or maintenance costs: I make about 60 gallons a year, and find that I typically spend anywhere from $20-$50 for more minor equipment, e.g. stoppers, fermentation locks, etc.

What's it all mean...... It means that my Nebbiolo costs me $4.83 a bottle to produce, not counting equipment costs, time, car wear and tear and gasoline.

The Sauvignon blanc cost less at $4.03 a bottle.

Are these costs typical? If anything, I'd say they are on the low side, due to great deals on the grapes.


Since there are plenty of good wines out there to be had for under$7.00 a bottle, you have to be making very good wine to beat the cost of buying retail.

I've made a few wines that I think would justify a $20 bottle price, but my typical wine costing me @ $5.00 to produce could be had retail for about the same price with careful shopping.....throw in equipment and time and you're losing money!


So why make wine? It's a hobby! You do it because you enjoy it! The making of wine, learning about wine, sharing your wine with friends, the bottling parties! and of course drinking wine!


Thursday, October 22, 2009

Playing Cellar Rat - Checking the wines

Feeling the need to check this year's wines before I leave on vacation for a few days; I tasted them all and racked the Sauvignon Blanc.

The Pinot Grigio is tasting OK... it seems lacking in any real character, not bad, just an ordinary white. Isn't that the rap on Pinot Grigio anyway?

Malvasia Biance is tasting very good just like my 2007 at this stage. The 2007 turned out very good. Thick, floral, clean with good acid.

The Sauvignon Blanc is going to be a big wine. Lots of flavor, but perhaps a little hot in the finish with some bitterness as well. Acid level may need some adjustments... I'm thinking I may need to do some blending with this one...

The Nebbiolo is very light in color. I'm disappointed since I thought I was making a heavier red wine. That said, it has great fruit flavors, a little coffee in the nose, and a bramble like finish... It will make a pleasant light red.

The Zinfandel is also light in color. More raspberry in color where the Nebbiolo is more brick red.
The flavors mirror the color with light raspberry fruit and good acid.... another light red.... {good thing I've made some heavy reds in the past that are available in the cellar!}

So, no disasters wine making wise, but maybe no real standouts either this year... but really too early to tell.

On another note: I always check out Trader Joe's wines to see what bargains they may have. The "Blue Fin" Pinot Noir at $3.99 is a nice light red with good fruit character and clean finish.

I mention the "Blue Fin" wine since I'm going to post an entry very soon talking about the costs involved in Home Wine making. "Think you are going to save money-think again!" So watch for that and check out "Blue Fin" and also "Down Under" Chardonnay.

Tuesday, October 13, 2009

Grape acid levels, PH, what to do about it, or not

So you get some grapes from a grower you are interested in the "numbers".

Measurments of the sugar level {Brix}, Acid level {PH} , and Total Acidity {TA} are typical measurements that home wine makers are interested in.

Brix and PH should be easy to measure with a hypdometer and a PH meter. TA is not so easy.

I always measure brix since this will determine if I can just start fermentation or if I have to adjust the sugar level before fermentation starts. Sugar level adjustments will get a separate blog entry.

I'm not so concerned with meauring PH and TA, though perhaps I should be..?? Mostly I am relying on getting good grapes {proper numbers} from a good source.

For me, acid level adjustments are done by taste and usally late in the wine making year when the wine is more of less finished with whatever changes it will go through.. The key question for me is; does it taste the way I want it to? e.g. is the acid level too high or too low?

A reason I rely more on taste than a PH measurement is that I have seen widely different numbers from different sources on the same grapes! What if the PH number is not accuate!

Note: a low PH wine tastes like it has high acid taste-wise. e.g. the lower the PH number, the higher the acid level to the taste... can be confusing no?...

If the acid level is too high, I can lower the level through blending in a lower acid wine.

If the acid level is too low, I usually add tartaric acid to bring the acid level up....I'm talking about small levels of acid adjustments like 1/2 teaspoon per 5 gallons of wine. I can always add more if needed....

Though I don't usually measure the PH, I probably should since it is a quantifable number to tell me where the wine is, and how I have changed it during adjustments.

What is "normal" PH for wine? Does that make a difference? --> Yes! for stability. See the article link below!

What is most important is what tastes good to you! This is your wine, make it for your taste! But it should not be out of a normal acid range due to spoilage and stability.

Here's a good general description of PH levels and how it impacts wine and the making process:

http://www.eutechinst.com/techtips/tech-tips42.htm

Wine Characteristic
Low pH Range(3.0 - 3.4) --> more stable, less Bacterial Growth, tastes more acidic...
High pH Range(3.6 - 4.0) --> less stabled, more Bacterial Growth, tastes bland, flat...


The Sauvignon Blanc numbers were: 24.5; TA = 4.7 & pH = 3.7

A PH of 3.7 is on the high side {lower in acid} and would indicate that something should be done to get a more stable wine. I think both Joe and Mike added acid to lower the PH. Perhaps they could comment on this...

There are formulas for computing how much acid to add to change a PH of x to y for z gallons of wine, so it is a fairly straightforward process, just don't add too much!

My thinking about the Sauvignon Blanc is that I have two other wines that I think are high in acid, the Malvasia Blanc and Pinot Grigio, and that blending for these wines with the Sauvignon Blanc is definitely in the plans.

Here's another link that points up the value of tasting the wine when adding acid...

http://www.winemakermag.com/stories/article/indices/6-acid/344-high-ph-low-ta-bottles-wine-wizard

But now that I say that the Malvasia and Pinot Grigio are high in acid {low PH}; I'm thinking that a PH number would be good to have.... Think I'll get a new PH meter....

All the 2009 wines are now aging, what's next?

Wine making seems to proceed at a frantic pace for a short time, followed by a more leisurely period during late fall and winter, then picks up again in the spring.


With the heavy rains in the bay area today, fall has finally arrived and wine making has changed speeds from fast to slow...


So what's next?


All of my wines have finished fermentation and are now in the cellar, clearing, and beginning the year long aging that is my wine making cycle.


The main task right now is racking the wines off the sediment when they clear, checking for any problems, tasting, and thinking about any blending that I may do with this years wines. This is a very relaxing and reflective time during the wine making year.


Time to reflect on what went right, what went wrong, talk about some wine making topics that I didn't cover, and to think about how I might want to improve my process next year.


Here are some topics I am thinking about for the next few posts:


  • Grape acid levels, PH, what to do about it, or not.

  • High sugar levels in grapes.

  • Grape sources

  • The wine making year - a one year cycle

  • Make wine yourself or with a group?

  • Blending

  • Do you even want to consider wine making as a hobby?

  • ....


Since the acid level in the Sauvignon Blanc was a topic of conversation between me, Joe and Mike who all got the same juice at the same time ; this topic seems like a good place to start.


If the rain continues I should get this blog entry posted soon - "Grape acid levels, PH, what to do about it, or not."

Wednesday, September 30, 2009

Sauvignon Blanc - Day 1- Juice Pickup

I've gotten behind in my posts as events began happening at a furious pace during the last week. A faulty computer that contains my video editing software and image library hasn't helped either.


In my last post I talked about pressing the Nebbiolo and Zinfandel. That was Sunday Sept. 20. On Monday Sept. 21 I was scheduled to pickup Sauvignon Blanc from Mendocino county.


Monday, Sept. 21: Day 1 for Sauvignon Blanc.

My friend, Joe, has worked out a sweet heart deal for a source of grapes from Mendocino country, and we have made a very good wine from the Mendocino Sauvignon Blanc for a few years now.

One big advantage of getting grapes directly from a vineyard/winery is that they know what it takes from a grape growing standpoint to make good wine.

I'll talk more about grape sources in a later post.


Anyway, the deal Joe has worked out, allows us to get pressed juice, so that the work of crushing/de-stemming and pressing is saved. We just bring our containers to the winery and they pump juice from the large holding tank directly into our containers.


So Monday morning early, Joe, Mike who is also getting the Sauvignion Blanc and I drove to Hopland to pick up the Sauvignon Blanc.

The winery workers know us now, and made short work of pumping the juice into our containers.


We added dry ice directly to our containers to chill the juice and also to provide a layer of CO2 to protect the juice from oxidation during the 5 hours we took to get back home. {A stop in Healdsburg for a Cheeseburger and Truffle fries was mandatory.}


Once home I added more dry ice to my container and left it to sit overnight.


The next morning I racked off the clean juice into carboys, put them into a water bath, and added Champagne yeast. {This is the same process I described for the Malvasia Bianca.}


After 7 days, I added the yeast food and ML culture to help finish off the fermentation.

Temperatures have cooled some in the last few days, so the fermentation may be a bit longer than with my other wines.

It's now Oct. 2 and the fermentation is just finishing. I plan to taste the Sauvignon Blanc today, and rack it if the fermentation is finished, e.g. if I do not taste any sugar left in the juice...

Thursday, September 24, 2009

Nebbiolo and Zinfandel - Day 10 Pressing


Sept. 20. This is day 10 for the Nebbiolo and Zinfandel, and it's time to press. The fermentation was a fast one lasting about 8 days. I let the must sit for another two days to hopefully extract more color and some tannins since it seemed like the wine(s) will be light in color and body.


You can tell when the fermentation is finished by measuring the brix, or by the amount of CO2 coming off when you punch the cap down. Measuring the brix will give you a false reading since the must now contains alcohol which is lighter than water... there should be a formula someplace for adjusting the reading..... I should research that.... anyone know? please comment!


Anyway, when the CO2 has blown off the must it is time to press, since the wine is now getting air exposure.


Step 1: is getting all the equipment ready... If you cleaned everything from your last pressing; it's not too much work. See the pic on the right... clean press, catch bucket, clean carboy waiting...


Step 2 :I like to rack off as much of the "free run" wine as possible. I found a great tool to aid in this step... it's a stainless steel tube about 2 feet long with holes in the sides. It is wide enough to insert a racking hose into it. The holes in the tube will allow the wine in and keep the skins out...


Step 3: While I'm racking off the free run, I use a bucket to scoop out the skins and fill the press. My wife watches the catch bucket under the press, and changes the full bucket for a empty one as needed. The wine is poured into the carboys.


Step 4: When the press is full, put on the top, add the wood blocks and press. Ratchet down the blocks, watch the wine flow, wait for the pressure to ease, then repeat.... You're done when the resistance makes it very difficult to ratchet down the blocks another step, or the handle gets down to the top of the basket.


Step 5: be sure to taste the new wine. Yes, the wine will be changing quite a bit over the next couple of years, but this first taste is telling; how is the color, what's the tannin level, high or low acid, any off odors, varietal character in the nose, etc. See the video where Doris, my wife and I taste the Nebbiolo and Zinfandel.


Step 5: Add fermentation locks to all the carboys, and move them into the cellar. Not an easy step for me as the cellar is full!


Step 6: Clean everything...this step takes as much time as all the previous ones... So we saved some time by pressing both the Nebbiolo and Zinfandel one after the other.


Here's a video of the process and first taste of the reds.


And fitting the carboys into the cellar....


Tuesday, September 22, 2009

Malvasia Bianca - Day 15 - Racking again


Sept. 18: The Malvasia has finished fermentation and the yeast has settled to the bottom of the carboy. So I wanted to do a another racking to clean up the wine before it goes into the cellar.


There's nothing too exciting about racking... it's more of a logistical problem of having the correct size of clean carboys to rack into.... e.g. there is always wine loss during ranking. For this racking, I lost about 1/2 gallon of wine.


As I racked the wine, I tasted it as I always do.... it still has a nice floral nose, tart acid. No sign of any H2S smell.


One carboy seems like it had softer acid than the others, so it probably went though ML fermentation and the others did not ....yet....


My experience with ML fermentation is that a wine goes through ML fermentation when it wants... you cannot control it... just recognize and test when it does occur.


The next step for the Malvasia is that the carboys will get moved into the cellar as soon as I make space by bottling some wine that is ready.


Thursday, September 17, 2009

Nebbiolo and Zinfandel - Day 6 ML addition

Sept. 16: It looks like the Nebbiolo and Zinfandel are racing along toward finishing the fermentation. I think this fast fermentation is due to warmer daytime temps, and nights not being cool enough.

I would call 10 day fermentation normal for my wines. 7 days is a fast fermentation.

So I'm a little worried about color and tannin extraction. The Zinfandel seems to have more color than the Nebbiolo, which is reverse of what I expected....

I added the ML culture and yeast food to help finish the fermentation. I'll probably let the must sit for two days before I press... So it looks like Monday for pressing the red wines.

Wednesday, September 16, 2009

Pinot Grigio - Yes, I'm making that too


I am making a Pinot Grigio. The grapes came in before I started the wine blog, so I decided not to write about it.... but then a friend asked about the wine....


The Pinot Grigio is from Villa Spatafora. It came in at 21.5 brix which is a little lower that I would have wanted. But tasting the wine now, 21.5 was probably a good brix number for this grape.


The wine has a mineral and flinty character and a nice acid level like the New Zealand Sauvignon Blancs. One of the knocks on Pinot Grigio, is that the grape makes a somewhat thick and low acid wine, so I'm happy to have something different at this point.


Pinot Grigio is a red grape. If you press the juice right after it is crushed, you get white juice. But if you let it sit on the skins in a cold soak for a day or two, you will get pink juice.


My friends at the Wine Group With No Name (WGWNN) are making their Pinot Grigio as a pink wine. I think that's a great idea and will be very interested to taste it.


While I was pressing my Pinot Grigio, my first two carboys were filled with free run juice are white. But the last two carboys that were pressed, were a very light pink.


I've kept the carboys separate and there is a difference in taste between the white and pink wine. As you might expect, the pink wine has fuller flavors. I'm looking forward to see how these two batches turn out...
The photos on the right show the pink and white Carboys of Pinot Grigio,

Monday, September 14, 2009

Nebbiolo and Zinfandel - Day 2 Yeast addition

Day 2 - Sept. 11: After picking up the Nebbiolo and Zinfandel yesterday, they sat in my garage for a day. It's more or less "tradition" with me to let the grapes sit for a day before adding yeast so that the meta solution kills of the wild yeast, dissipates, and the grapes have a chance to "cold soak".

See http://www.crushnet.com/video/series/winemakers-minute/ep6-winemakers-minute-episode-6-cold-soak


I add the yeast to the must {skins and juice} by sprinkling the yeast on the top. The yeast will grow slowly and after a day will have spread over the surface of the must.

The reason I add the yeast in the way, is that I want a slow, cool fermentation and experience over the years have proven to me that this method works best to achieve that kind of fermentation.

Early in my wine making hobby, I prepared a traditional yeast starter. {..the yeast is re hydrated and allowed to grow in a container, e.g. a gallon jug, until a large population of yeast is achieved.} At that point the starter was added to the must , it just exploded with a very active and fast fermentation. e.g. about 3 days as apposed to 8-10 days

The resulting wine, was light in color, had H2S and was low in flavors.... so I don't do that anymore!

About my yeast choice.... I use Champagne yeast for all my wines... I find that the Champagne yeast starts fermentation easily, likes a long cool fermentation, preserves the fruit character of the grape, tolerates high alcohol, and will reliably finish the fermentation.

Of course, I may be giving up some flavor components that a particular strain of yeast may enhance for a grape variety... oh well, I'll take consistency and the good fruit character achieved with the Champagne yeast over perhaps more complexity....

Sunday, September 13, 2009

Nebbiolo and Zinfandel - Day 4 Fermentation underway

Day 4- Sept. 13 . The Nebbiolo and Zinfandel are both under going an active fermentation. There's not much to do at this point except "punch" down the "cap" a few times a day.

As Co2 is produced by the active fermentation, the grape skins are pushed up to the top of the container forming a tight pack of skins called the "cap".

Punching down the cap is breaking up this tight bunch of skins and mixing them back into the fermenting must.

Although it is an easy process, it is very important one for these reasons: the CO2 protects the skins and prevents spoilage; and color, tannins and other flavors are extracted from the skins so it is important to keep them mixed into the liquid.
The video at the left, shows punching down the yeast that was sprinkled over the surface of the must at day 2.

Malvasia - Day 9 - Racking wine off the sediment

Day 9 - Sept. 13. I'm a little worried about the Malvasia. The fermentation seems to be finished faster than expected and I feel that I need to rack the wine to get it off the sediment.


One of the big dangers in the early stages of making wine is having hydrogen sulfide {H2S} form in the wine..e.g. rotten egg smell.


One reason for H2S to form is the breakdown of the yeast after the fermentation has finished.

Another reason for H2S is presence of elemental sulfur in the wine. e.g. Elemental sulfur used in the vineyard too close to harvest time.


See these articles for more info...


http://www.ajevonline.org/cgi/content/abstract/28/3/1%2037


http://www.etslabs.com/display.aspx?catid=48,50,66&pageid=94


One protection against H2S is to rack the wine off the sediment {lees} as soon as possible after fermentation....so I was anxious to rack the wine....


It turned out I had good reason to be worried as I noticed a trace of H2S in 2 of my 3 carboys of Malvasia when racking the wine.


At this point in the process, a little aeration of the wine blows off the H2S. So hopefully all will be well. I'll check the wine again in a couple of days....

Friday, September 11, 2009

Nebbiolo and Zinfandel Grape Pickup


On Thursday Sept. 10, I picked up the Nebbiolo and Zinfandel grapes from Villa Spatafora.


When I arrived, the vineyard workers had everything ready to go, so the entire crushing/de-stemming and loading into my car took only 15 minutes!


The Nebbiolo and Zinfandel grapes bins were sitting side by side, and I couldn't tell which one was which! A quick taste test confirmed what the workers told me... the Nebbiolo grapes were the ones with the chewy skins!


Don't laugh, it's not easy...On the drive over my wife was reading me a story about a large winery owner that got sued for selling Zinfandel as Cabernet Sauvignon...


Not having any labels with me, I had to remember which containers were Nebbiolo and which were Zinfandel! Let's see... Nebbiolo crushed first, into the car first, so it's the last containers out...

When I got home I measured the brix. The Nebbiolo came in at 25 brix, and the Zinfandel at 22.5 brix.

Malvasia - Day 7- adding ML Culture and Yeast food

Day 7: Well the weather has been hot and the nighttime temperatures not that cool, so the fermentation has gone faster than expected.

During the end of fermentation a yeast food is added to make sure that the fermentation will finish. Also I add ML {Malo-Lactic} culture to the wine at this point.

ML culture will facilitate a ML fermentation where Malo acid is converted to Lactic acid. An ML fermentation will soften a wine, but adds some characteristics that some people do not want ...

See this link for more details: http://en.wikipedia.org/wiki/Malolactic_fermentation

For me, I want all my wines to go through a ML fermentation if possible, since the wine will be more stable once bottled. The worst case is for the wine to go through an ML fermentation after it is bottled! So I try to force an ML fermentation as early as possible.

One negative side affect of an ML fermentation is the lowering of the crispness of the acid taste. If this is an issue for the wine, I will add acid {tartaric acid} prior to bottling to bring back the crispness... it all depends on what I'm trying to do with the particular wine.

OK the fun part... I get my first taste of the Malvasia! After all, that's the reason the make wine, the drinking!

I try to taste each wine at every step along the way, to build my knowledge of the wine over time and help plan out things I may need to do with the wine in the future.

Wednesday, September 9, 2009

Malvasia Bianca - Day 1-3, Press, rack and start


Day1 continued: After arriving home from the vineyard, we had to press the grapes. I have my own wine press so pressing the grapes is something that I can do at home and more or less at my own schedule.


I have an old standard press, a #35 Wood Basket Press that I purchased many many years ago. Why #35?? Strange naming ... it holds 13 gallons so that's not it... It works great, and I expect it to outlast me! Since the basket holds 13 gallons, I have to press the wine in two loads of the basket.


One thing I will recommend for pressing white wine grapes is that when loading the press include some of the stems that were saved from crushing/de-stemming. I usually layer the stems in between 4-5" of grapes.


The stems provide some resistance for the press to use to get the juice out of the grapes. Otherwise It's like trying so press jello! I have seen some wineries use rice hulls in the press to provide the needed resistance...

I pressed 22 gallons of juice from the Malvasia. The juice measured 23 bix.


For grins, here a picture of my first press.... I made it from plans that I found in a "Mother Earth News" magazine way back in the 70s when I first started making wine. Notice that the press mechanism is an old car jack!


Back in those days, money was tight, and so I made wine as inexpensively as possible. e.g. making my own equipment and using free grapes and fruit where I could find them.


Ever had Fig wine? Politely decline if offered a glass....


A good thing about those days is that the mistakes I made were less costly, and I could practice techniques without spending lots of money.


Day 2: Rack clear juice off the sediment:


After the juice has had a chance to sit for a day, I rack off the clear{er} juice off the sediment. The reason for doing this to get cleaner juice that is free of some of the material that will add additional flavors to the wine. For example, I find that much of the heavy "Grassy" character in Sauvignon Blanc is eliminated by starting with clean juice.


You can lose a fair amount of juice {left behind as sediment} during this racking, say as much as 10% of the pressed juice.


Some wine makers will add a fining agent during the setting period to remove even more of the solid materials. I do not do this for fear of stripping away too much character.


After racking, the carboys were placed into their water baths and then I sprinkled Champagne yeast into each carboy. Lastly a fermentation lock was placed into the carboy.


Day 3: Yeast growing slowly


I'll post a separate blog entry to talk about yeast and my method of inoculation and reasons for this method.


I think this brings me up to date e.g. day 4 of the Malvasia my first blog entry.


Tuesday, September 8, 2009

Grapes ready for Pickup Thursday - Nebbiolo

I received an email from the vineyard manager yesterday saying that the Nebbiolo grapes were ready! They are at 25 brix. We set the pickup date for Thursday at noon.

25 brix is a little high and hopefully they won't gain another point before I pick them up.... but the true brix number will be determined when we crush the grapes and all the bunches are mixed together. e.g. some bunches may be 22, some 26 brix.... it the average number that counts!

Red grapes that come in too low in brix are a problem... they can make thin and acidic wines. If the brix is too high, you can get a wine that is very high in alcohol or worst, a fermentation that does not finish leaving a sweet wine.

One way to deal with high brix red grapes is to add water to the crushed grapes to lower the brix number. You must also add acid to bring the acid level back up, e.g. compensate for the water addition... but more on that if I have to do it... hopefully not.

BTW: My grapes supplier for the Pinot Grip, Malvasia Bianca, and Nebbiolo I'm making this year is Villa Spatafora in Tracy, CA.
http://www.villaspatafora.com/

My contact is Bob Granvelle. Bob is a very nice guy and a pleasure to do business with. Prices are very good. email Bob at: spatafore@caldsl.com It's late in the year, but there still might be grapes available.

Monday, September 7, 2009

Malvasia Bianca - Day 1 -Grape pickup, and crush


Day 4 for the Malvasia was my first post, so now it's time to backtrack and talk about days 1-3.

Day 1: The vineyard owner contacted me via email to let me know that the Malvasia was ready for harvest. We had agreed earlier that I wanted the grapes to come in at 23-24 brix. Luckily, we agreed to a grape pickup in two days. Sometimes you have to drop everything and go...."the grapes are ready, can you be here this morning?"

"Brix" is the measurement of sugar in the grapes: See this link for a definition: http://www.kenswineguide.com/wine.php?word=18

If you read the definition, you may be asking why I wanted the brix higher than "normal".... the short answer is that I also am making a Pinot Grigio that came in a little low in brix, and I plan to do some blending later on...e.g 24 brix= 13.2 alcohol! more on that later....

For me, it was a relatively short drive to the vineyard, about 1 hour.

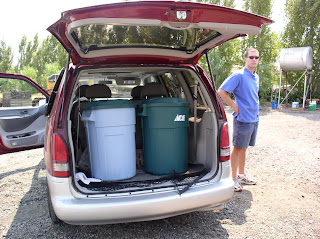
To pick up the grapes I brought the following equipment:

3 - 32 gal plastic garbage cans
1 - plastic bucket {in case I needed to "bucket" grapes from one container to another...}
1 - gallon jug containing my sterilizing solution of Potassium Metabisulfite
A drying towel, a water bottle, my wine notebook, AND my checkbook!


The vineyard owner was waiting for me and had the grapes picked into 5 40lb grape bins....The bins were overflowing with grapes so the 5 bins totaled more the 250lbs.

A side note here.... 250 lbs of grapes yield about 6 cases of finished wine. That's enough to drink for the year, and be able to give some to friends, and not too much if you make a bad wine....yes it does happen...


The vineyard owner had a crusher/de-stemmer set up for us to use. This is not always the case, so be sure to check beforehand! If the owner doesn't provide a crusher/de-stemmer, you'll have to borrow or rent one. I do not have my own crusher and find that a home wine maker can get along fine without one.

Next we crushed the grapes into 2 of my plastic garbage cans. Why two? 125 lbs in each container means that my wife and I can lift the containers into and out of my van!

The third garbage can held the stems from the grapes that are spit out of the crusher/de-stemmer. Why keep the stems? They are needed for the pressing that I'll talk about soon...


I added the Potassium Metabisulfite solution to each plastic garbage container of grapes secured the lids, tied them down! {important! don't want sticky grapes all over your ride} and drove home.

See this link for the use of the "Meta" solution:


This post is getting long... I'll talk about pressing the Malvasia in the next post.


Sunday, September 6, 2009

Malvasia Bianca - Day 4, Fermenting away


The wine I'm making is Malvasia Bianca. I am making a dry white wine from the Malvasia. The grape produces a wine with a nice floral nose. You used to see a lot of Malvasia wines around made mainly in a aperitif style.


The Malvasia is in a water bath, actively fermenting away. It will take about 10 days to complete fermentation depending on the weather. Grapes that come in later in the year when the nighttime temps are cool take longer. e.g. cold fermentations take longer, and are best for making white wines.


Home wine makers don't need no stainless steel jacketed fermenters!


The 30 gallon plastic garbage cans filled with water keep the fermenting carboys cool while the juice converts to wine! While the daytime temps can be warm, the night cools the water down negating the need for more expensive solutions to provide a cold fermentation for the white wine. This is a very good solution for home wine makers wanting to make wine white.


I missed taking photos and video of day 1-3 for the Malvasia - pick up the grapes, crush them , press, rack the juice and start the fermentation, But we'll have a chance to see those processes with the other grape varieties that I plan to make this year.


So now there is nothing to do except check the fermenting carboys daily to make sure they don't blow off their fermentation locks!


When the fermentation is really going, foam and juice can pop off the locks and spew gunk all over the place. That why you should not fill the carboys to the top when fermenting the juice. I leave perhaps 5" of space in the carboy...


Wow, I'm realizing that there is so much to talk about... each comment leads to 10 more that I should talk about at some point.


Oh well, if you have a question, just ask!


I've got to go out now and deal with the Malvasia skins from the pressing... into the compost bin with them!